Diagonal Box Stitch Cowl v1(Zoe's Method)

Materials:
- Crochet hook: H/8-5.00mm
- Yarn: Caron Simply Soft, 1 skein of 6 oz/170/315/yds/288m
- Tapestry needle (with blunted end)
Crochet Abbreviations, Terms, Definitions:
Lr =Long row. It refers to the row of boxes (dbs) that is 1 box longer than the short row. Another way of describing it is that, this is the row that makes the outer boxes at each end or edge of the project.
Sr = Short row. It refers to the row of boxes (dbs) that is 1 box shorter than the long row. Another way of describing it is that, this is the row that makes the inner boxes at each end or edge of the project.
See Photo 15.
Wsu = Wrong side up
Rsu = Right side up
Ws = wrong side
Rs = Right side
Ws = wrong side
Rs = Right side
Dbs = Diagonal box stitch
Tc = Triple crochet
Sc = Single crochet
St = Stitch
Nxt = Next
Sp = Space
Sk = Skip
Despite my proofreading effort, there may still be errors, so please let me know if you find errors. I appreciate your trying out this pattern and comments will be greatly appreciated. This would help me improve my pattern writing skills. Thank you very much.
Sk = Skip
Skill level: Intermediate
Suggestion:
Before making a big or actual project, make a swatch starting with 3 DBS boxes, for first row (lr) and 2 DBS boxes for the second row (sr), following all the instructions as written, until you become familiar with all the techniques and stitches used.Despite my proofreading effort, there may still be errors, so please let me know if you find errors. I appreciate your trying out this pattern and comments will be greatly appreciated. This would help me improve my pattern writing skills. Thank you very much.
Technique Used:
Study Photo 15 and read the numbered Notes before beginning to follow the instructions to clarify how the Diagonal Box Stitch (Zoe's Method) is made.
Notes:

Photo B: Shows the Diagonal Box Stitch (dbs) boxes with wrong side up (wsu). First row has 3 boxes as indicated by the numbers in red letters. The light blue arrows indicate the orientation of the tc posts.

Photo C: Compare the boxes in this photo to that of the above photo. All the boxes here are right side up, the ones above are wrong side up.

Photo on the left is Photo 1. Photo on the right is 2.
Photo1 shows the right (front) side of the chain up; while Photo 2 shows the wrong (back) side of the chain up.
- When an instruction says "tc nxt st" or "tc on same st", the hook is inserted on both back and front loops.
- How to identify long row (lr) and short row (sr): By sight, see Photo B and C above. Photo B shows the bottom row (1st row) as the lr. and the top row as the sr. On Photo c, the hook is positioned at the end of the short row which means that the next row or 3rd row will be lr. and will have 3 boxes. These photos are for demonstration only and not the actual project.
- The actual project has 15 boxes in the long row and 14 boxes in the short row which add up to a total of 29 boxes. This pattern is made for small size. To increase the size for medium or large, increase the total number of boxes in the first row. The total number of rows must be an odd number because the project must end in the long row to keep the top and bottom corners even. The project begins and ends with odd number of rows.
- The boxes tend to twist and curl as you crochet them in the first row so it is important to be able to identify the wrong side (ws) from the right side (rs) as you would have to untwist and orient properly each box as you work on them on the second row. See Photos 6,7, B and C for proper orientation of the row of boxes on the first row.
- Remember that the last box of the lr has 1 post more than the rest of the boxes in the same row. This 5th post is where the finishing stitches (edging) will be crocheted over.
- Notice also the direction of the arrows on the first row and second row. See Photo B and C.
- How to identify front or back of a chain: Compare Photo 1 and 2 above.
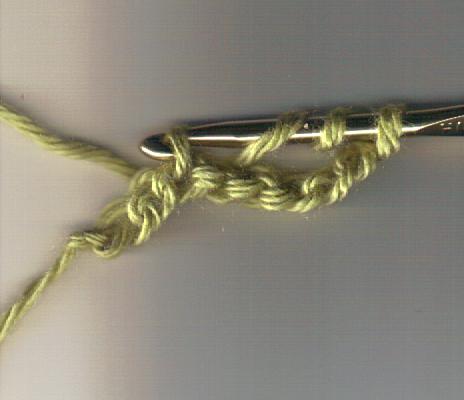 Photo 3: Shows tc on 5th ch from hook inserting hook on both back and front loops from back (ws) to front (rs) of the chain stitch and drawing loop up toward the back (ws) of the ch st.
 Photo 4: Shows first Diagonal Box Stitch (dbs) box made.
The Pattern:
Row 1:
* Ch8. [Twist chain so that the back of the chain stitches are facing up]. Tc on 5th ch from hook as shown on Photo3. (Tc on nxt st) 3 times. Flip dbs box wsu. Ch1, sc on same st. Note: Same stitch is the stitch where current loop on hook is attached. Ch3, skip nxt 3 tc posts., sc next sp. See Photo 4.* Repeat * * until required number of dbs box in this LR is meet.Edit 10-10-2021: On last box of row 1, skip instructions: “ Flip dbs box wsu. Ch1, sc on same st. Note: Same stitch is the stitch where current loop on hook is attached. Ch3, skip nxt 3 tc posts., sc next sp.”
Do not flip the last DBS box on the row 1.
 Photo 5: Shows first box of Row 2 completed.
Row 2:
With right side of the current box facing you, make: *Ch3, (tc over last post of the same box) 3 times. Align the next box so that the posts of the two boxes points in the same direction. Skip ch3 of the next box and sc on next sp.* See Photo 5. Repeat * * until total number of boxes on this short row is met. Turn. See Photo 6 of the completed first and second row. Photo 6: Shows the completed Row 1 and Row 2.
Row 3:
With previous row wrong side up: Ch7, repeat instructions inside bracket [ ] on Row 1. Tc on 5th ch from hook, (tc nxt st) 2 times. Sk 3 tc posts, sc nxt sp. See Photo 7 and 8. *Ch3, (tc over same sp) 3 times. Sk nxt 3 tc posts, sc nxt sp.* Repeat * * until required number of boxes in the long row is met. For last box in the LR, do 1 more tc over same post. See Note no. 5 and Photo 9. Turn. Photo 7: Shows wrong side up of the previous row 2. Hook is positioned to start row 3.
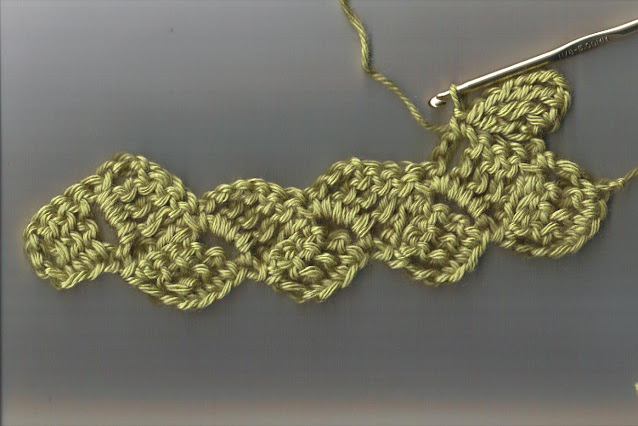 Photo 8: Shows the first box of row 3 completed.
 Photo 9: Shows end of LR with last box having total of 5 posts instead of 4.
Row 4 (Short Row):
Ch1, sc on same st, ch 3 sk next 3 tc posts, sc nxt sp. * Ch 3, (tc posts over same sp) 3 times. Sk 3 tc posts, sc nxt sp.* See Photo 10 and 11. Repeat * * until total number of boxes in this row is met. Turn to start the next row. Attach a yarn marker as shown on Photo 13 as a reminder Not to go toward the direction where the yarn marker is. If doing a big/long project, adjust the yarn marker every 12 rows so it is visible.Row 5 and remaining odd numbered rows: Repeat Row 3.
Row 6 and remainng even numbered rows: Repeat Row 4.
Do Row 3 and 4 alternately until the cowl (or any DBS project) mets the desired length or width.Note: The cowl or scarf must begin and end in a long row to keep all four corners even. Notice that Photo 12 does not have even corners, because last row is an even numbered row and the starting row was an odd numbered row . On the other hand if a blunted corner is desired then start and end a project with even numbered row.
 Photo 10: Shows all the completed boxes of Row 3. The hook is positioned to begin Row 4.
 Photo 11: Shows first box on Row 4 completed. Hook is positioned to begin the next box in the row.
 Photo 12: Shows the hook at the end of Row 4. Row 4 is completed.
 Photo 13: Shows yarn markers on each side of the project.
 Photo 15: Green dots = boxes of long rows; red dots = boxes of short rows, dark blue arrows indicate the directional orientation of tc posts in long rows; light blue arrows indicate the directional orientation of tc posts in short rows. Green numbers indicate odd numbered long rows. Red numbers indicate even numbered short rows.
Finishing:
*Make ( sc on top of nxt st, catching both back and front loops) 4 times. Exception: On the edge of first row, only the back loop is available for attaching the finishing sc. Make 4 sc on nxt ch-3 sp.* Repeat * * around. See Photo 16.Note: Hide the yarn tail, (found at the beginning row) within the sc stitches. See Photo 17 and 18.
The finishing sc stitches should end where it was begun. Close the round by slst on top of nxt sc. Yo and draw a loop. Pull this loop tight by tugging on the working end of the yarn. Cut the yarn leaving a 6 to 7 " working end or tail. Thread this tail through a yarn needle and hide it within the single crochet sts, at the back or wrong side of the finishing round. See Photo 19 and 20. Adding resistance knots before cutting the remainder of the yarn prevents tail from getting pulled out of sc stitches, during use and laundering. See Photo 21 and 22. Photo 16: Shows 4 sc on top of tc posts and 4 sc on ch-3 sp.
 Photo 17: Shows the tail of the yarn being sandwiched between the yo and loops on hook.
 Photo 18: Shows the tail of yarn enclosed within the sc stitch.
 Photo 19: Shows how the working tail of the yarn is hidden within the wrong side of the sc stitches, using a yarn needle.
 Photo 20: Shows the tail of the yarn being hidden on top of the next dbs box sc stitches.
 Photo 21: Shows a resistance knot being made. The knot needs to be pulled tight before the needle is inserted on the rest of the sc stitches. Make 2 to 3 of these knots one half inch apart before cutting the remainder of the yarn. These knots are hidden also under the sc stitches.
 Photo 22: Shows finished DBS project with all the tails and knots hidden.The Photo is a swatch of the actual project.Happy Crocheting!!!Comment: It’s been 9 years after I posted this, this is now 2021 and I found an error on Row 1: It is very hard to edit your own work. I’m more objective now because I have completely forgot how I did this work. I apologize to those who may have tried to do this pattern.On Row 1, the last box of the row, which is a long row, should skip flipping up the work, making ch1-sc-on-same stitch, skipping 3 tc sts and sc on next sp - all these should be skipped. then do Row 2.


Comments
Post a Comment