Circle Motifs Connected Row by Row Without Breaking The Yarn
Circle Motif Tutorial - Part 1
Please refer to the diagram also. (Diagram is currently being drawn).
Crochet Project: Bicolored Scarf With Circle Motifs
Materials: Yarn = Caron Simply Soft, Med. (4), 6 0z./170g/315 yds/288 m; 1 skein of each color (A) and color (B). Please choose your favorite colors.
Crochet Hook = size 4.0mm to 4.25mm
Crochet Technique used: Continues Crochet. When making crochet
stitches, hook is always inserted on any of these: Fl-bl, bl-ul, fl-yol. The idea is to have a minimum of 2 loops of yarn on hook at all times, so that the stitches are strong and stable.
Please refer to the post, "Crochet Terms And Abbreviations/ Definitions ":
[ = Where crochet instructions to be repeated begins.
] = Where crochet instructions to be repeated ends. Example: Repeat [ ] Means to do all the instructions within the [ ].
( ) = repeat instruction/instructions within parenthesis _x_number of times.
* * = repeat instructions within the two asterisks. also writen: from * to * .
fl-bl = front loop and back loop
bl-ul = back loop and under loop
fl-yol = front loop and yarn over loop
 | |
| Photo 1 |
 | |
| Photo 2 |
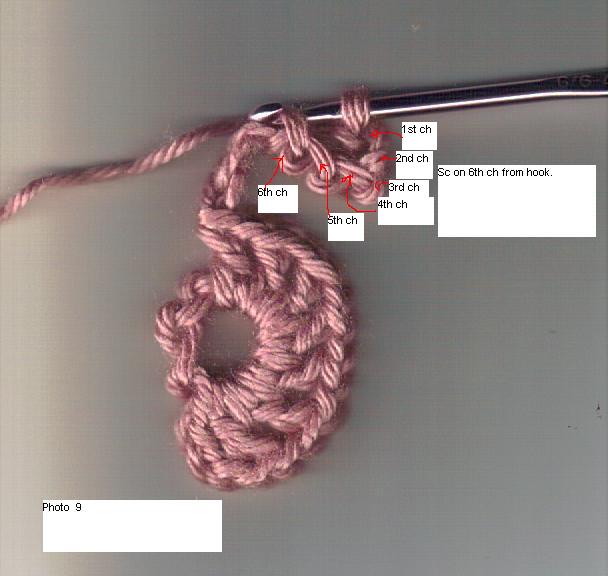
Ch6. Sc on 6th ch from hook to form a ring. See photo 1 and 2.
 |
| Photo 6-A |
Ch3, dc over ring. (ch1, dc over ring)7times. See Photo 6-A and Photo 8
Note and corrections: There should be a total of 9 dc posts, counting the starting ch-3!!! The photo below only shows 8--it's an error.
 | |
| Photo 8 |
 | |
| Photo 10
Ch2, INSERT HOOK ON 2ND CH FROM LAST SC; ROTATE WORK BY MOVING IT OVER TO THE RIGHT OF THE YARN. SEE PHOTO 11 AND 12.
|
 |
| Photo 11 |
 | |
| Photo 12 (Above) |
 | |
| Photo 13
Slst on same st where hook is. See photo 13. (Ch1, dc over ring) 7times. * NOTE: 2nd HALF MOTIF MADE.
Repeat from * to * to make the remaining motifs (this project requires 3 total motifs).
|
 | |
| Photo 15 |
 |
| Photo 16
(Ch1. Dc over ring) 7 times. See photo 16. NOTE: PUSH DC STITCHES CLOSE TOGETHER TO HAVE ENOUGH ROOM FOR ALL 16 DCS.
|
 |
| Photo 17
Completed round motif shown on photo 17. Ch1, slst on 2nd ch of next ch2. See photo 17.
|
 |
| Photo 19
Note: 3 circle motifs are shown on this (above) photo.
|


Please note the correction on Photo6. Thanks:)
ReplyDeleteNotes and Corrections: Photo 6-A is replaced with the right information in it.
ReplyDelete