Making The Connecting Loops
Circle Motif Tutorial - Part 2
(Please refer to Part - 1 to see the beginning of this tutorial).
Please click photos to enlarge.
Note: Connecting loops are stitches that connect the rows of motifs together. In this project ch5, ch3, and dc2tog are used.
Slst to next ch1. *Ch5, skip (sk) next 2 dc post, sc next ch1. Ch3, skip next 2 dc, sc next ch1. Ch2, skip 2 dc, 2 dc-tog on next ch1 sp of 2 adjacent motifs ( See photo 23).
Note: 2 dc-tog, also written in most crochet instructions as dc-2-tog or dc2tog.
Ch2, skip next dc, sc next ch1 sp. Ch3, skip next 2dc post sc next ch-1 st.
Ch3, skip next 2dc post sc next ch-1 st. Ch2. Make 2 dc-tog on next ch-1 st of 2 adjacent motifs (see photo 24).
Ch2, skip next 2dc, sc next ch-1. Ch3, skip next 2dc, sc next ch1*. NOTE: SUBSEQUENT ROWS, END BY MAKING: Ch5, skip next 2dc, sc next ch1. AND WILL NOT REPEAT * *.
Repeat from * to .* IF THIS IS THE FIRST ROW OF MOTIFS, to complete the other side of the motifs. CONNECTING LOOPS ON SUBSEQUENT ROW OF MOTIFS ARE DONE ONLY ON ONE SIDE. (See photo 25 and 25-B).
Note: For the remaining motifs, connecting loops on one side of the motifs are done while they are being attached to the other row of motifs. (See photo 25-B).
On this project only 2 colors are used: (Choose your favorite 2-color combination)
I used A = purple; B = light pink.
Note: The two rows of motifs are joined with right sides of A and B motifs facing out (in other words, wrong sides together). Make sure that the incomplete motifs are not twisted when joining the two rows.) A = purple motifs; B = light pink motifs.
Ch2, skip next 2dc on A and sc on next ch1 sp of A. Ch2, sc on next sp of B. Ch2, skip next 2dc of A and sc on on next ch-1 sp of A.Ch1, sc on ch-2 sp sp of B.
Ch1, skip next 2-dc, 2dc-tog on adjacent motifs of A (See photo 25-B Above ).
Ch1, sk next 2-dc of A and sc next Ch-1 of A. Ch1, sc on next ch3 of B. Ch1,
skip 2-dc of A and sc on nx ch-1 sp of A. Ch1, sc on next sp of B. Ch1, skip nx 2-dc on A and make 2dc-tog on adjacent motifs of A (as before, see photo 25-B).
Ch1, sc on next sp of B. Ch1 sk 2-dc and sc on next ch-1 of A. Ch1, sc on B. Ch1, sk 2-dc and sc on nx ch-1 of A. Ch2, sc on nx sp of B.Ch2, skip nx 2-dc and make a sc on A. Ch3, slst on top of slst. Note: Two rows (Motif A and B connected). Make a "shoe lace" temporary knot on B. (See photo 26)
How To crochet (working)Yarn A on the sides of Row A and B
(Ch5, sc on nx sp) Repeat ( ) until last ch5-sp of B. Ch12.] (See photo 27).
Repeat the same process [ ] for the subsequent row of motifs KEEPING IN MIND THAT CONNECTING LOOPS ON THE CURRENT WORK IS DONE WHILE IT IS BEING ATTACHED TO THE PREVIOUS WORK.
(Please refer to Part - 1 to see the beginning of this tutorial).
Please click photos to enlarge.
Note: Connecting loops are stitches that connect the rows of motifs together. In this project ch5, ch3, and dc2tog are used.
Slst to next ch1. *Ch5, skip (sk) next 2 dc post, sc next ch1. Ch3, skip next 2 dc, sc next ch1. Ch2, skip 2 dc, 2 dc-tog on next ch1 sp of 2 adjacent motifs ( See photo 23).
Note: 2 dc-tog, also written in most crochet instructions as dc-2-tog or dc2tog.
 | |
| Photo 23--Shows dc2-tog |
Ch2, skip next dc, sc next ch1 sp. Ch3, skip next 2dc post sc next ch-1 st.
Ch3, skip next 2dc post sc next ch-1 st. Ch2. Make 2 dc-tog on next ch-1 st of 2 adjacent motifs (see photo 24).
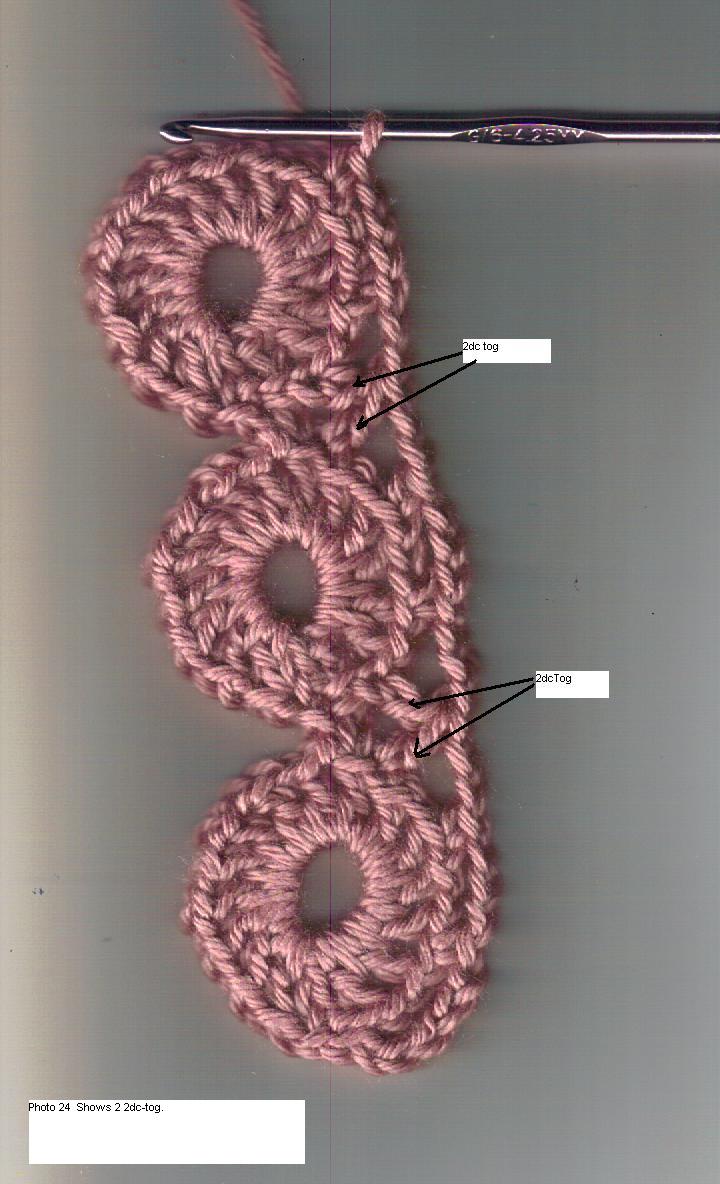 |
| Photo 24-- Shows 2 2-dc-togs. |
Ch2, skip next 2dc, sc next ch-1. Ch3, skip next 2dc, sc next ch1*. NOTE: SUBSEQUENT ROWS, END BY MAKING: Ch5, skip next 2dc, sc next ch1. AND WILL NOT REPEAT * *.
Repeat from * to .* IF THIS IS THE FIRST ROW OF MOTIFS, to complete the other side of the motifs. CONNECTING LOOPS ON SUBSEQUENT ROW OF MOTIFS ARE DONE ONLY ON ONE SIDE. (See photo 25 and 25-B).
 |
| Photo 25-- Completed Color B motifs |
Note: For the remaining motifs, connecting loops on one side of the motifs are done while they are being attached to the other row of motifs. (See photo 25-B).
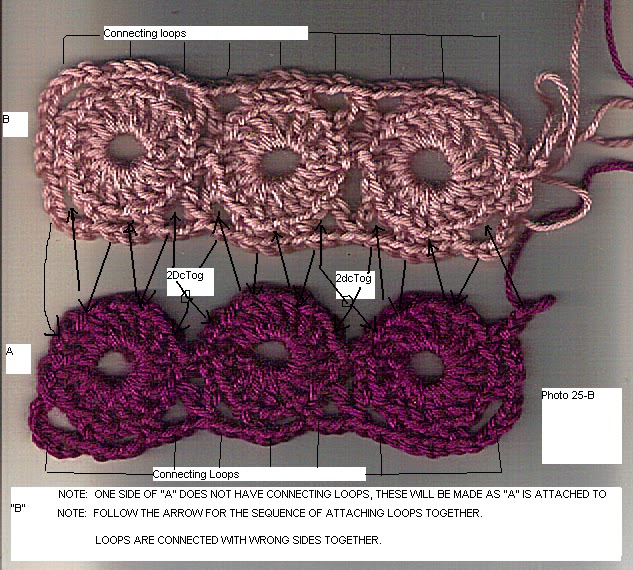 |
| Photo 25-B |
On this project only 2 colors are used: (Choose your favorite 2-color combination)
I used A = purple; B = light pink.
Note: The two rows of motifs are joined with right sides of A and B motifs facing out (in other words, wrong sides together). Make sure that the incomplete motifs are not twisted when joining the two rows.) A = purple motifs; B = light pink motifs.
Ch2, skip next 2dc on A and sc on next ch1 sp of A. Ch2, sc on next sp of B. Ch2, skip next 2dc of A and sc on on next ch-1 sp of A.Ch1, sc on ch-2 sp sp of B.
Ch1, skip next 2-dc, 2dc-tog on adjacent motifs of A (See photo 25-B Above ).
Ch1, sk next 2-dc of A and sc next Ch-1 of A. Ch1, sc on next ch3 of B. Ch1,
skip 2-dc of A and sc on nx ch-1 sp of A. Ch1, sc on next sp of B. Ch1, skip nx 2-dc on A and make 2dc-tog on adjacent motifs of A (as before, see photo 25-B).
Ch1, sc on next sp of B. Ch1 sk 2-dc and sc on next ch-1 of A. Ch1, sc on B. Ch1, sk 2-dc and sc on nx ch-1 of A. Ch2, sc on nx sp of B.Ch2, skip nx 2-dc and make a sc on A. Ch3, slst on top of slst. Note: Two rows (Motif A and B connected). Make a "shoe lace" temporary knot on B. (See photo 26)
 |
| Photo 26-B--A and B connected. |
How To crochet (working)Yarn A on the sides of Row A and B
(Ch5, sc on nx sp) Repeat ( ) until last ch5-sp of B. Ch12.] (See photo 27).
 | ||
| Photo 27-A |
Repeat the same process [ ] for the subsequent row of motifs KEEPING IN MIND THAT CONNECTING LOOPS ON THE CURRENT WORK IS DONE WHILE IT IS BEING ATTACHED TO THE PREVIOUS WORK.


Comments
Post a Comment